Thursday 29 August 2013

Apologies!


Apologies!

OK, so I broke the daily challenge already! I am officially rubbish. I've just been to busy working full time to keep up with it. Anyways, here are some of my most recent photographs from my stay in Southend-on-Sea.

@LewisAlanJones

Thursday 22 August 2013

Day 7 - Negative Scanner


So, Day 7 it is. Just a quick one today. Below are some of my photographs from the 'dark ages' when I first began getting into photography (So they aren't exactly great!). I have used a negative scanner to create all the images as a digital format. I can't recommend this enough. I have previously used my negative scanner to make digital copies of all our old family photos. As you know negatives do tend to get damaged or begin to fade over time. You can pick up one of these devices from Amazon, prices ranging anything from £30 to hundreds of pounds! Mine was only a cheap one (£40) and it seems to do OK! Anyways, I think is worth the investment as you can share your film photographs easily as well as preserving the image in a digital format. 


Thanks for viewing,


Tuesday 20 August 2013

Day 6 - Photographs You Should Really Know About!

I thought today I would do something a little different, and blog about the three most important photographs to me, ones which I feel you should really know about. 


Saigon Execution, Taken by Eddie Adams - This is a photograph of Major General Nguyen Ngoc Loan executing a handcuffed prisoner by the name of  Nguyễn Văn Lém. There is much controversy surrounding this photograph but the official story is Lém was a Việt Cộng officer in Saigon during the Tet Offensive.  However, A Southern Vietnamese official after the execution said that Lém was only a political operative. Unfortunately, I believe it's difficult to say, as either side have great reason to lie about the true events.  This photograph is important to me as it managed to spark mass anti-war movement. I feel this shows the true power of a single photograph and the media. Eddie Adams said himself "The general killed the Viet Cong; I killed the general with my camera. Still photographs are the most powerful weapon in the world. People believe them, but photographs do lie, even without manipulation. They are only half-truths. What the photograph didn't say was, What would you do if you were the general at that time and place on that hot day, and you caught the so-called bad guy after he blew away one, two or three American soldiers?"

Thich Quang Duc's Self-Immolation, Taken by Malcolm Brownes. This is a photograph of the Vietnamese Mahayana Buddhist monk, Thich Quang Duc, who burnt himself to death. This image was also taken in Saigon like the previous. However, unlike Lém, Quang Duc had chosen his own fate. He was protesting against the persecution of Buddhists by the Southern Vietnamese government led by Ngo Dinh Diem. Photographs of the self-immolation quickly circled the world. The actions of Quang Duc caused international pressure to be placed on Diem. He later announced reforms which had the intention of mollifying the Buddhists. At the time of the incident, President Kennedy said “No news picture in history has generated so much emotion around the world as that one."Once again, a photograph made history and changed the future. Although these two images may be considered horrific, they did a great deal of good.  

Photograph taken by Yomiuri Shimbun.  This one is less of a history lesson, but one I really thought I should include for a contemporary element to the post. I am sure you can all re-call the Japanese tsunami. This is a 4-month-old baby girl in a pink bear suit which was miraculously rescued from the rubble by soldiers after being missing for four days after the tsunami. This photograph shows to me and I hope to you, that even after something terrible, we have the ability to pick ourselves back up and carry on. I think that's important for us to remember, we are survivors. Bad things happen, the tsunami, the self-immolation and the Saigon Execution. All terrible events. But when something goes bad, we fix it, the best we can.

Thanks for reading, I hope you enjoyed the change up!


@LewisAlanJones
P.S. I'd be interested to hear you comments on whether I should just stick to the normal posts or put more of these up in the future.

Monday 19 August 2013

Day 5 - Ahoy!

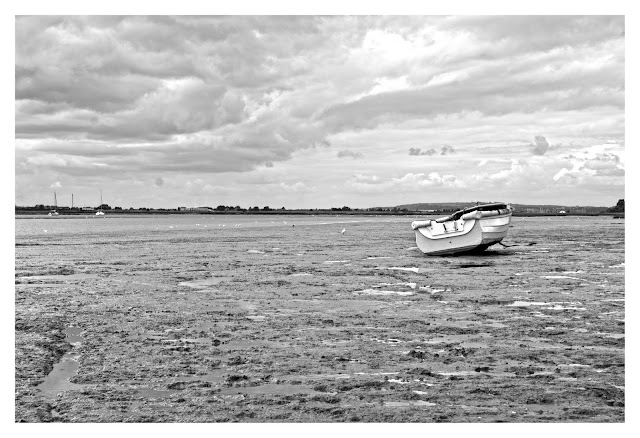
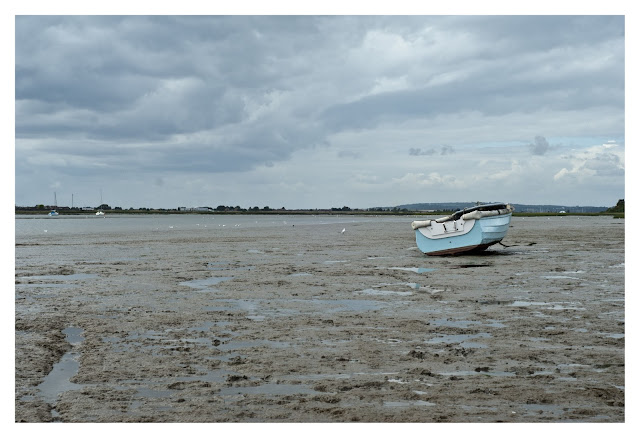
Original

B&W Original

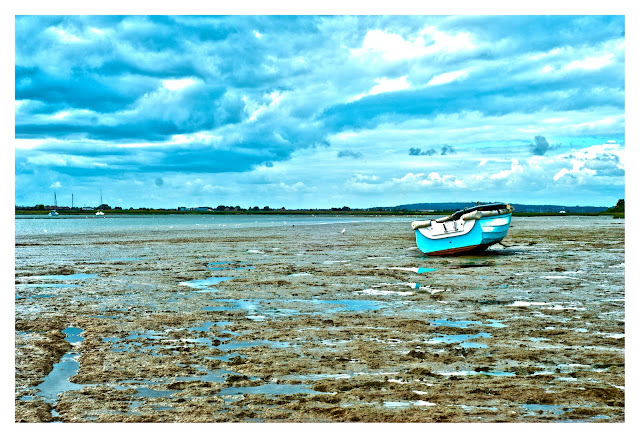
HDR Toning of B&W Original

HDR toning of original
Day 5 - Ahoy!

This photograph was taken at Leigh-on-Sea. Today I wanted to show you again how you can make a photograph a little more interesting simply in Photoshop. I am sure you will agree that the first image is a bit boring. In terms of composition, it's not too bad but, the lighting does it no favours. Usually when the lighting is a bit off, my first thought is 'how would it look in B&W' which you can see from the second image, this is what I tried. However, still unhappy with the image looking too flat, I wanted to add some definition to it. I stumbled across the 'HDR Toning' function under Image>Adjustments>HDR Toning. After putting the 'detail' up to a level I was happy with, the third image was the result. So by using this quick function you can make your photographs a lot less flat looking!


After this, I went back to my original photograph and wondered what the HDR toning would do for that, image 4 was the result. A lot better than the original in my opinion but perhaps a bit overkill too! I'll let you make up your own mind on it. 

Anyways, I hope this is another little trick in Photoshop which helps. 
Thanks for reading as always, and if you have any HDR photographs you are proud of tweet me them, I'd like to see!

Sunday 18 August 2013

Day 4 - Gulls


Day 4 - Gulls

OK, so here is my first 'proper' attempt at any wildlife photography I guess! I believe these are Red-Billed Gulls, but as I am no expert, I am not 100%. If you do happen to know, please do correct me! 

I've always had a lot of respect for wildlife photographers and cameraman, I think this stems from all the BBC documentaries I have seen over the years. Doug Allan and similar professionals make the documentaries come to life in my opinion.  As expected, a lot of patience is needed for trying to get a good shot of any animal, and a hardened exterior to combat the elements might also come in handy! So a few things I would recommend you take for a day out in the wild: Spare memory card/large memory card, extra battery juice, tripod as always!, food and drink (I don't know about you, but I am always hungry!), macro and telephoto lenses. The list could go on and on but as one of my friends once told me, if you're going to be out all day taking photographs, do you really want to be lugging a suitcase around?

I hope you liked the photographs, practice is definitely needed!
Thanks for reading,

Day 3 - Southend Carnival


 Day 3 - Southend Carnival

Here is a couple of snaps of the Southend Carnival from last night. I guess it's cheating a little as I didn't take them today, but I have an excuse! I am going to be out all day taking photographs of (Hopefully) wildlife! I must say, it's not exactly my area of expertise but everyone starts somewhere! 

I had to include the second photograph on this blog post even though it's not strictly of the carnival. The photograph isn't really much more than a snapshot but I love the lighting in it, it might be food for thought for future photographs.

On a side note, I came across a pretty useful resource earlier for when shooting models. It is basically a small guide for how to get your models to pose. You can access it through this link, hope it helps:  Click here

Thanks for reading, 
As always follow me:


Saturday 17 August 2013

Day 2 - Within a Book

Original

Geometric Distortion

Perspective Distortion

Day 2 - Within a Book

Good morning, good afternoon and good evening, for whenever you are reading! Here is my 'Day 2' photograph for the daily challenge. You'll notice there is actually three photographs as I wanted to show you some quick things you can do on Photoshop, which in turn, can drastically change your image.

So, I still know a lot of photographers who disagree with heavy photoshopping, but, in my eyes it's just a part of photography now. In fact, editing your images has always been  a part of photography even when the darkroom was in its prime; dodging/burning, reversals, warping, you name it!

Down to business then. The second and third photographs all come from the same source file (the first photograph), but have been manipulated using the 'Lens Correction' feature . This tool in Photoshop is really effective in showing you as a photographer, what might  work better in future when you are out photographing. The 'Lens Correction' feature can be found under the 'Filter' menu in Photoshop. As soon as you open 'Lens Correction', a menu will pop up, click on custom and adjust as you wish.

'Geometric Distortion' gives it a kind of fish eye look. Using the 'Transform' function, you can change the perspective of the photograph. I find the Vignette tool quite helpful as well. It darkens or lightens the corner of your images putting more focus on the centre of your photograph.

As previously mentioned, I feel 'Lens Correction' is a powerful lesson for aspiring photographers because it allows you to see which perspectives might work better when photographing and where lens choice like a fish-eye might be an excellent choice.


Anyways, thanks for reading! Hope this little 'tutorial' helps, if you get any decent results, I'd love to see! 

You can tweet me at: @LewisAlanJones